All I wanted was to prove a point. specifically, that my room was freezing and the heating needed to be turned up.
When I received a Raspberry Pi for my birthday, I figured this was the perfect excuse to build a temperature monitor. I grabbed a Freenove RF starter kit (available online) and decided to hook up a DHT11 sensor. It seemed simple enough: wire it up, read the data, and generate some charts to validate my complaints.
Spoiler alert: It wasn’t that simple.
Phase 1: The Magic Smoke Link to heading
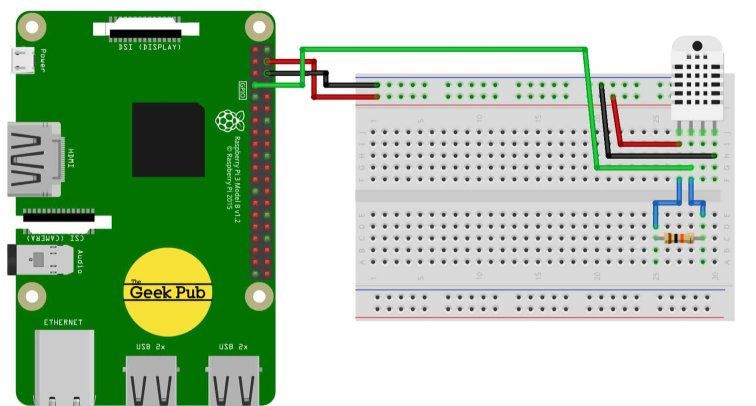
The setup guide provided with the kit was straightforward. I connected the Pi, the sensor, and the resistor to the breadboard.
But as soon as I powered it up, I ran into the classic hardware rite of passage: Magic Smoke. If you smell burning plastic, stop. I didn’t bother investigating whether I had wired the resistor backward or if the sensor was just a dud from the budget kit. I just knew that the 4-pin sensor was toast.
I swapped it out for a newer, 3-pin DHT11 module. The wiring was cleaner, and more importantly, it didn’t catch fire.
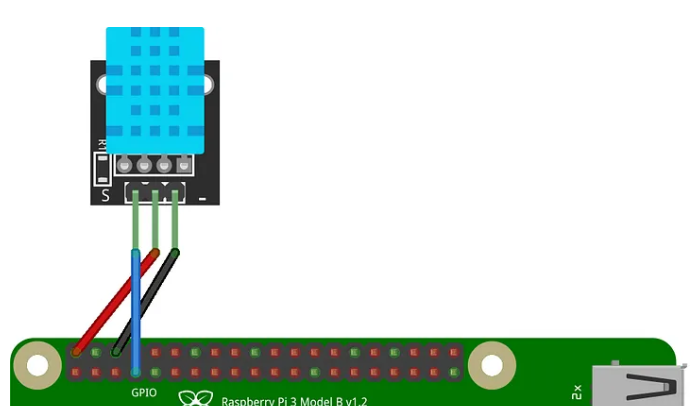
I fired up the provided Python script, changed the config to GPIO 4, and… success!
Code Example:
#!/usr/bin/env python3
import time
from Freenove_DHT import DHT

DHTPin = 4     #define the pin of DHT11

def loop():
    dht = DHT(DHTPin)
    time.sleep(1)
    counts = 0
    while(True):
        counts += 1
        print("Measurement counts: ", counts)
        for i in range(0,15):
            chk = dht.readDHT11()
            if (chk == 0):
                print("DHT11,OK!")
                break
            time.sleep(0.1)

        print("Humidity : %.2f, \t Temperature : %.2f \n"%(dht.getHumidity(),dht.getTemperature()))
        time.sleep(2)

if __name__ == '__main__':
    print ('Program is starting ... ')
    try:
        loop()
    except KeyboardInterrupt:
        pass
        exit()
We had data! Humidity and Temperature were streaming in. But here is the problem: I didn’t want Python. I wanted to write this in Go. I figured, “Surely, someone has done this before.” I closed the Python script and opened my terminal, ready to go get a library and call it a day.
Phase 2: The Pi 5 Curveball Link to heading
My first instinct was to grab github.com/MichaelS11/go-dht or anything based on periph.io. I whipped up a quick test script:
package main

import (
    "fmt"
    "github.com/MichaelS11/go-dht"
)

func main() {
    err := dht.HostInit()
    if err != nil {
        fmt.Println("HostInit error:", err)
        return
    }

    sensor, err := dht.NewDHT("GPIO4", dht.Fahrenheit, "")
    if err != nil {
        fmt.Println("NewDHT error:", err)
        return
    }

    humidity, temperature, err := sensor.ReadRetry(10)
    if err != nil {
        fmt.Println("Read error:", err)
        return
    }

    fmt.Printf("Humidity: %v, Temperature: %v\n", humidity, temperature)
}
I built it. I ran it. And… silence.
Errors. Timeouts. The sensor that was happily chatting away with Python was giving my Go program the cold shoulder.
After hours of debugging, I found the culprit, and it wasn’t my code. It was the hardware. I am running a Raspberry Pi 5.
Here is the kicker: The Pi 5 uses a completely new GPIO architecture called RP1.
Old Way (Pi 3/4): Libraries accessed GPIO via memory mapping at /dev/gpiomem.
New Way (Pi 5): The memory layout is completely different. The old libraries are effectively shouting into the void.
The Pi 5 requires you to use the modern Linux GPIO character device interface (/dev/gpiochip…). If I wanted this to work in Go, I was going to have to build it myself.
Phase 3: Reverse Engineering the Protocol Link to heading
Before writing a single line of Go, I needed to know how that Python script was succeeding where Go failed. I opened Freenove_DHT.py and saw this
import ctypes

lib_name = '/usr/lib/libdht.so'
lib = ctypes.CDLL(lib_name)
lib.setDHT11Pin.argtypes = [ctypes.c_int]
lib.readSensor.argtypes = [ctypes.c_int, ctypes.c_int]
lib.readSensor.restype = ctypes.c_int
lib.readDHT11.restype = ctypes.c_int
lib.getHumidity.restype = ctypes.c_double
lib.getTemperature.restype = ctypes.c_double
Wait, what? The Python code wasn’t actually talking to the sensor directly. It was using ctypes to call a C library (libdht.so). The real magic was happening in C code that used WiringPi for GPIO access.
I dug into the C source code (DHT.c) and found the actual protocol implementation. This is where things got interesting.
Cheaters! The Python script wasn’t reading the sensor at all; it was just a wrapper around a compiled C library. The real magic was hidden inside a shared object file using WiringPi.
I dug into the C source code to understand the actual protocol. The DHT11 is a weird beast. It doesn’t use standard protocols like I2C or SPI. It uses a custom single-wire protocol that relies on incredibly precise timing.
The Handshake Link to heading
Wake Up: The Pi pulls the line LOW for 18ms, then HIGH for 40µs. This tells the sensor, “Hey, wake up!”
Response: The sensor pulls the line LOW for 80µs, then HIGH for 80µs. This is the sensor saying, “I’m awake, get ready.”
The Data (The Tricky Part) Link to heading
The sensor then sends 40 bits of data. But it doesn’t send them as standard digital signals. It encodes them in time.
Every bit starts with a ~50µs LOW pulse.
To send a ‘0’: The sensor holds the line HIGH for 26-28µs.
To send a ‘1’: The sensor holds the line HIGH for 70µs.
To read the data, we don’t just check if the pin is high or low; we have to use a stopwatch. If the HIGH pulse is short, it’s a 0. If it’s long, it’s a 1.
Phase 1: Wake Up Call Link to heading
The host (our Pi) needs to wake up the sensor with a specific signal:
GPIO:  ─────┐                    ┌─────
            │     18ms LOW       │ 40µs HIGH
            └────────────────────┘
We pull the pin LOW for 18 milliseconds, then HIGH for 40 microseconds, then release the line (switch to input mode).
Phase 2: Sensor Response Link to heading
If the sensor heard us, it responds with its own signal:
GPIO:        ┌─────┐
             │ 80µs│ 80µs
─────────────┘     └─────────  [data follows]
             LOW    HIGH
The sensor pulls LOW for about 80µs, then HIGH for 80µs. This is its way of saying “I’m awake and ready to send data.”
Phase 3: Reading 40 Bits Link to heading
Now comes the tricky part. The sensor sends 40 bits of data, and the way it encodes 0s and 1s is clever:
Bit = 0:    ┌──┐
            │  │ ~26µs HIGH
────────────┘  └────────
   ~50µs LOW

Bit = 1:    ┌───────┐
            │       │ ~70µs HIGH
────────────┘       └────
   ~50µs LOW
Every bit starts with a LOW pulse of about 50µs. Then comes a HIGH pulse—if it’s short (~26µs), it’s a 0. If it’s long (~70µs), it’s a 1.
The key insight: we measure how long the HIGH pulse lasts. If it’s longer than about 50µs, it’s a 1.
Phase 4: Decoding the Data Link to heading
Those 40 bits form 5 bytes:
| Byte | Content |
|---|---|
| 0 | Humidity integer (e.g., 32) |
| 1 | Humidity decimal (usually 0 for DHT11) |
| 2 | Temperature integer (e.g., 23) |
| 3 | Temperature decimal (e.g., 5 → 0.5°C) |
| 4 | Checksum (must equal bytes 0+1+2+3) |
So if we read [32, 0, 23, 5, 60], that means 32% humidity, 23.5°C, and the checksum is 32+0+23+5 = 60. ✓
Building the Go Package Link to heading
Armed with this knowledge, I set out to port the protocol to Go. The first challenge was finding a GPIO library that actually works on Pi 5.
After some research, I found go-gpiocdev by warthog618. This library uses the modern Linux GPIO character device interface (/dev/gpiochip0) instead of the legacy memory-mapped approach. Perfect for Pi 5.
The Core Read Function Link to heading
Here’s the heart of the implementation—the function that reads the 40 bits:
func (s *Sensor) readRawBits() ([5]byte, error) {
    var bits [5]byte

    // Lock goroutine to OS thread - critical for timing!
    runtime.LockOSThread()
    defer runtime.UnlockOSThread()

    // === PHASE 1: Send start signal ===
    line, err := s.chip.RequestLine(s.pin, gpiocdev.AsOutput(0))
    if err != nil {
        return bits, err
    }

    line.SetValue(0)  // Pull LOW
    time.Sleep(18 * time.Millisecond)  // Wait 18ms

    line.SetValue(1)  // Pull HIGH
    busyWait(40 * time.Microsecond)    // Wait 40µs

    line.Close()

    // === PHASE 2: Switch to input, wait for response ===
    line, err = s.chip.RequestLine(s.pin, gpiocdev.AsInput)
    if err != nil {
        return bits, err
    }
    defer line.Close()

    // Wait for LOW response, then HIGH response
    waitForValue(line, 1, timeout)  // Wait for LOW to end
    waitForValue(line, 0, timeout)  // Wait for HIGH to end

    // === PHASE 3: Read 40 bits ===
    mask := byte(0x80)
    idx := 0

    for i := 0; i < 40; i++ {
        // Wait for LOW pulse to end
        waitForValue(line, 1, timeout)

        // Measure HIGH pulse duration
        start := time.Now()
        waitForValue(line, 0, timeout)
        highDuration := time.Since(start)

        // If HIGH lasted > 50µs, it's a 1
        if highDuration > 50*time.Microsecond {
            bits[idx] |= mask
        }

        mask >>= 1
        if mask == 0 {
            mask = 0x80
            idx++
        }
    }

    return bits, nil
}
The Timing Challenge Link to heading
The biggest concern I had was timing. The DHT11 protocol requires microsecond precision, and Go is a garbage-collected language with a scheduler that can pause your code at any moment.
Two techniques made this work:
1. runtime.LockOSThread() - This tells Go: “Keep this goroutine on this OS thread. Don’t move it around.” This prevents the scheduler from causing unexpected delays during the critical timing loop.
2. Busy-waiting instead of sleeping - For microsecond delays, time.Sleep() is too imprecise. Instead, I used a spin loop:
func busyWait(d time.Duration) {
    start := time.Now()
    for time.Since(start) < d {
        // spin
    }
}
Yes, it burns CPU cycles, but for a few microseconds, it’s the only way to get the precision we need.
// Create sensor - just provide the pin number
sensor, err := dht.NewDHT11(4)
if err != nil {
    log.Fatal(err)
}
defer sensor.Close()

// Read with automatic retry
reading, err := sensor.ReadRetry(15)
if err != nil {
    log.Fatal(err)
}

fmt.Printf("Temperature: %.1f°C\n", reading.Temperature)
fmt.Printf("Humidity: %.1f%%\n", reading.Humidity)
$ sudo ./dht-read -once
DHT11 sensor on GPIO4
---
Humidity: 32.0%
Temperature: 23.4°C
It worked. And not just once—it was stable.
I compared the output against the Python/C reference implementation, and the numbers matched perfectly. We had successfully ported the protocol to native Go, bypassing the legacy memory mapping issues entirely.
Key Takeaways Link to heading
If you are trying to do hardware hacking on the Raspberry Pi 5 with Go, here is what you need to know:
-
The Pi 5 changed the rules: Old GPIO libraries (rpio, periph.io) likely won’t work because of the RP1 chip.
-
Use gpiocdev: Look for libraries that use the Linux character device interface.
-
Go is fast enough: With LockOSThread, Go can handle the microsecond-level timing required for custom protocols like DHT11
Wrapping Up Link to heading
What started as “I just want to read a temperature sensor” turned into a deep dive into GPIO protocols, timing constraints, and the differences between Raspberry Pi generations.
I have open-sourced the package at github.com/afroash/dht. It supports both DHT11 and DHT22, and it works flawlessly on the Pi 5.
Now, if you’ll excuse me, I have a graph to generate and a landlord to annoy.
Have questions or found a bug? Open an issue on GitHub or reach out on Twitter @afro_ash